Deploy your Rails 7 app with Kamal and CI/CD
We'll run through an example utilizing the Kamal gem to deploy our Ruby on Rails application to a server with BitBucket Pipelines.
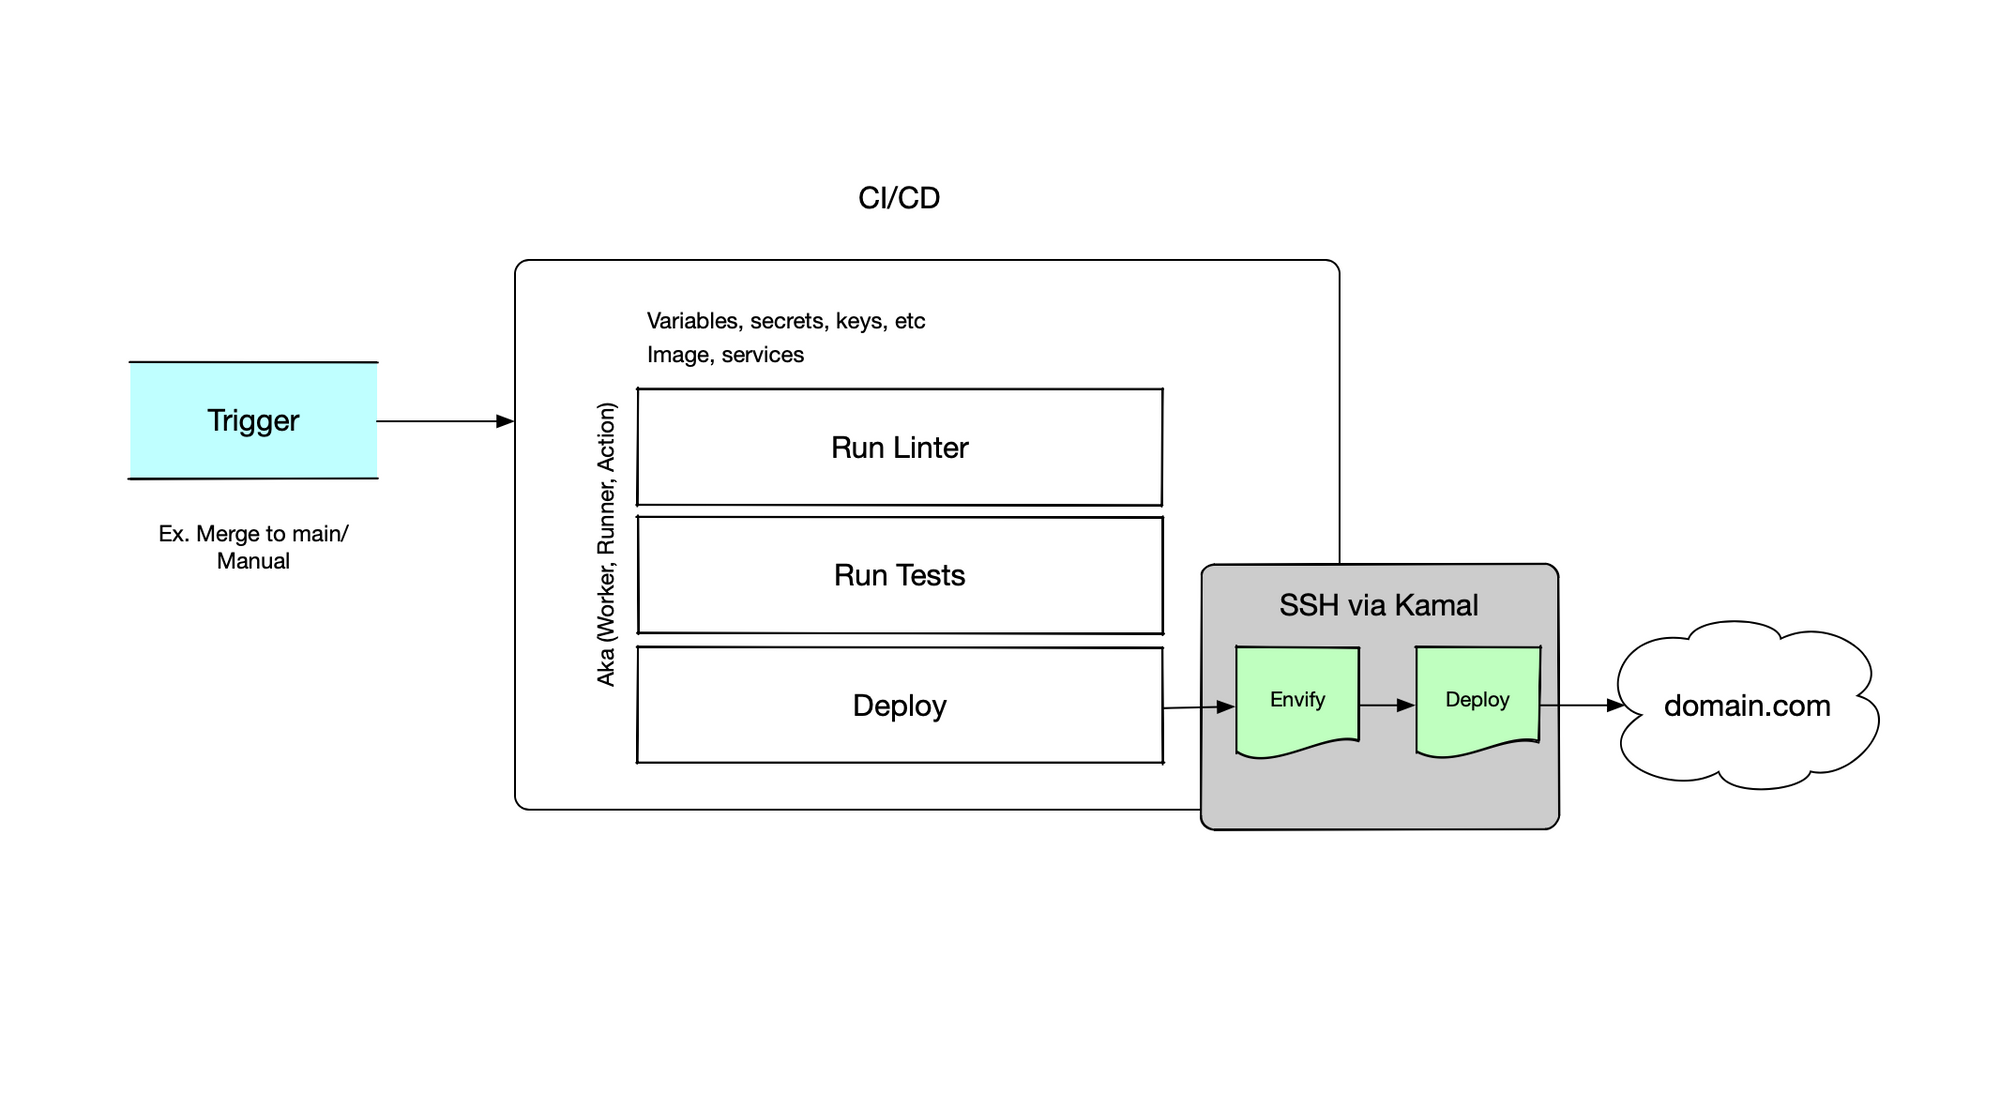
In this post I'll attempt to cover the process to setup your git repository to allow it to deploy your Ruby on Rails application with the Kamal deployment tool. Unless you've been stuck in full code sprint mode, I'm sure you've heard of Kamal by now.
I've used Gitlab and BitBucket Pipelines to successfully configure this in the recent past. Your mileage may vary with Github, as I haven't had a need to deploy with it yet. I've linked a post below that might help you deploy with Kamal and Github Actions. As with most solutions, this is a simple example to get you deployed. Your environment, development process and application conditions will vary.
1. A virtual machine instance
2. Git repository with your code pushed
3. Access to configure the repository
4. Kamal configured and pushing to your virtual machine
Configure SSH Keys
Once you have a repository for your code, you'll need to configure the SSH keys to allow the CI/CD workers access to your server. BitBucket makes this relatively easy, they create an SSH key for you as well as allow you to add a known_hosts entry. Go to Respository Settings > SSH Keys from your repository. Follow the instructions on screen. You'll add the generated public key to the authorized_keys on your server (staging/production).
Configure Environment Variables
Next you'll want to enter in your environment variables for the specific stage of deployment. If you go to Repository Settings > Deployments you'll see three default environments. Enter the variables so they match up with what you're needing for Kamal to run. For instance, I setup these variables in various forms of clear text and secret values:
RAILS_MASTER_KEY=
POSTGRES_PASSWORD=
REDIS_URL=
DB_HOST=
RAILS_ENV=
The above key value pairs will be used when Kamal generates the env files for your application containers. On the BitBucket side $RAILS_MASTER_KEY will evaluate to that value when the Pipeline runs. If the value was entered as a secret, the value will be masked in the logs with the key name. This usually happens when running the envify command of Kamal, alternatively you can also use the Kamal env command to manage the env files and push them up to your virtual machine.
Create or update bitbucket-pipeline.yml
Time to configure the Pipeline yaml file. As it always seems to go, each vendor has their own flavor of CI/CD configuration. There are differences to each platform, and one may not fit your needs. Below I've entered a simple Pipeline which is manually triggered on our repository. When we push to the main branch the Pipeline will run and wait for us to confirm the deploy. This is where your development process will come in and you can slot this deploy anywhere based on your own Pipeline rules.
From top to bottom, we're starting off by having the overall Pipeline use the Ruby image. We need docker included to run our Kamal commands and this is specific to BitBucket on how they allow docker in their Pipelines. After that we create a cache for bundler. (This may be unnecessary.)
Within the pipelines key in the yaml, you'll see our named Deploy to Staging step. We reference the cache, set the deployment type and trigger to manual. The script portion of this is where all the action happens. We'll need to tell BitBucket to enable docker buildkit. After that, since the Kamal gem has dependencies that require a few system level packages, you'll see we add apt-get install -y ca-certificates curl gnupg openssh-client build-essential git to ensure we have everything we need to gem install kamal.
# bitbucket-pipeline.yml

image: ruby:3.2.2-slim

options:
  docker: true

definitions:
  caches:
    bundler-cache:
      key:
        files:
          - Gemfile.lock
      path: vendor/bundle

pipelines:
  default:
    - step:
        name: 'Deployment to Staging'
        caches:
          - bundler-cache
        deployment: staging
        trigger: 'manual'
        script:
          - export DOCKER_BUILDKIT=1
          - apt-get update && apt-get install -y ca-certificates curl gnupg openssh-client build-essential git
          - gem install kamal
          - kamal envify -d staging
          - kamal deploy -d staging
Let the Kamal fun begin. We'll focus in on the second to last line kamal envify -d staging. When we run envify, Kamal will lookup the variable values we set for the deployment on BitBucket since that's the context we're in. It will generate the .env or .env.staging in this case, based on your .env.*.erb. Be sure to have that file included in your project. Then envify will run based on dotenv gem hierarchy and priority (https://github.com/bkeepers/dotenv#what-other-env-files-can-i-use). You'll see SSH connections happening and uploading to your virtual machine. You can login to your server and verify the env values are set and coming in as expected, just check the .kamal folder on the server. You can even modify this file to fix a failing container from starting, if you had to. Just know that it could change after any envify or env push command.
After that, the running of the Kamal deploy command will go thru the normal build process, push to your repository, and do the reverse, pull latest and deploy dance. After a successful deploy you'll have the new version of your application released available on your virtual machine.
Some parting notes for debugging
If you see a failure happen, check the commands that Kamal is running. You can likely reproduce exactly where the failure is happening and back track to what the issue is. More than likely it will land in the env variable being the culprit, or a value not being present that is expected at application load time.
You can login to your server and run the images that are stored on your server. docker exec -it CONTAINER_ID /bin/bash is a helpful one to get in and poke around with what Kamal is trying to run. printenv will output environment variables in the container. If the container isn't running use docker run -it CONTAINER_ID /bin/bash. You can also output logs of running containers with the docker logs CONTAINER_ID command.
